示例程序
LVGL Demo
如需运行 LVGL demo, 可在 Luban-Lite 系统 RT-Thread 配置中执行 me 命令打开配置界面,具体步骤如下:
-
进入 Application options 配置:
Application options ---> *** Filesystem related *** [*] Using File System Image 0 ---> [*] Using File System Image 1 ---> (8) size of cluster in fatfs image [ ] Generate burner format image *** LVGL demo select related *** -*- LVGL (official): powerful and easy-to-use embedded GUI library ---> [*] ArtInChip LVGL demo ---> (/rodata/lvgl_data) LVGL Resource Directory -
在 LVGL (official) 选项卡中,设置线程优先级、栈大小和显示刷新周期等参数,一般默认不需要设置。
-
在 ArtInChip lvgl demo 选项卡中,选择要使用的 demo 应用。
-
设置 LVGL Resource Directory 为(/rodata/lvgl_data),一般默认不需要设置。
- 保存设置并退出配置界面。
- 编译并烧录程序到开发板。
完成操作后,即可运行所选的 LVGL demo。
配置代码示例如下:
注:
每个参数的含义详见LVGL 使用指南。
Application options  --->
*** Filesystem related ***
[*] Using File System Image 0  --->
    --- Using File System Image 0
    Select File System Type (FATFS)  --->
    (rodata/) Data Directory
    (rodata.fatfs) Image Name
    [*]   auto calcuate image size
    [*]   using default volume label
[*] Using File System Image 1  ----          Select File System Type (LittleFS)  --->
    (data/) Data Directory
    (data.lfs) Image Name
    (4096) Erase block size
    (256) Page size
(8) size of cluster in fatfs image
[*] FATFS enable write func in spinor
[ ] Generate burner format image
    *** LVGL demo select related ***
-*- LVGL (official): powerful and easy-to-use embedded GUI library  --->
    --- LVGL (official): powerful and easy-to-use embedded GUI library
      Select LVGL Version (LVGL V9)  --->
    (20)  Priority of LVGL thread
    (32768) Stack size of LVGL thread
    (5)   Display refresh period (ms)
    [ ]   Support SquareLine Studio
    [ ]   Enable built-in examples
    [ ]   Enable built-in demos
[*] ArtInChip LVGL demo  --->
    --- ArtInChip LVGL demo
      select LVGL demo (LVGL demo of meter)  --->
    (16)  LVGL color depth(32/16)
    (8)   LVGL image cached number
    (0x800000) LVGL image cached size
    (20)  LVGL image header cached number
    [ ]   LVGL enable display rotation
    [ ]   Limit the output size of MPP JPEG decoder
    [*]   LVGL use custom config
    [ ]   LVGL use monkey touch test
(/rodata/lvgl_data) LVGL Resource Directory
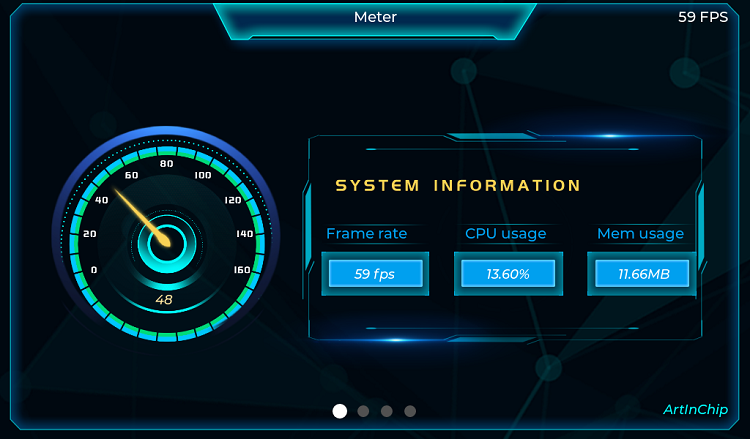
界面运行示例如下所示:
用户自定义 APP
本节演示添加一个名为 test_demo 的 LVGL 应用,详见中的LVGL 使用指南。
- 添加 APP 选项在 application/Kconfig 中,添加下列代码:
config AIC_LVGL_METER_DEMO bool "LVGL demo of meter" config AIC_LVGL_TEST_DEMO # 添 加 AIC_LVGL_TEST_DEMO, 以 便 在 menuconfig␣菜 单 中 选 择 bool "LVGL demo of test" config AIC_LVGL_LAUNCHER_DEMO bool "LVGL launcher demo" - 配置 APP使用 me 命令进入配置界面,在 Application options 中选择 AIC_LVGL_TEST_DEMO,并保存配置:
Application options ---> [*] ArtInChip LVGL demo ---> select LVGL demo (LVGL demo of test) ---> ( ) LVGL demo with basic function ( ) LVGL demo of meter (X) LVGL demo of test ( ) LVGL launcher demo - 配置素材路径
Application options ---> [*] Using File System Image 0 (rodata/) Data Directory [*] Using File System Image 1 (data/) Data Directory - 源码适配
-
将源码解压缩至 packages/artinchip/lvgl-ui/aic_demo 目录下,文件结构为:
tree -h. └── [4.0K] test_demo ├── [4.0K] lvgl_src │ └── [ 0] readme.txt # 该文件用于验证资源打包,本身为空文件 ├── [ 571] SConscript ├── [4.0K] thread │ ├── [1.0K] test_thread.c │ └── [ 211] test_thread.h └── [4.0K] ui ├── [1.3K] test_ui.c └── [ 228] test_ui.h -
根据实际项目路径,修改 test_demo 中的 SConscript 文件:
from building import * import os cwd = GetCurrentDir() group = [] src = Glob('*.c') # 源文件路径 src += Glob('./ui/*.c') src += Glob('./thread/*.c') CPPPATH = [cwd] # 头文件路径 CPPPATH.append(cwd + './ui') CPPPATH.append(cwd + './thread') list = os.listdir(cwd) for d in list: path = os.path.join(cwd, d) if os.path.isfile(os.path.join(path, 'SConscript')): group = group + SConscript(os.path.join(d, 'SConscript')) # 打包素材的路径 if GetDepend(['LVGL_STORAGE_PATH']): ins_dst = GetDepend('LVGL_STORAGE_PATH').strip('"/') else: ins_dst='rodata/lvgl_data' ins_src = 'assets/' install = [(ins_src, ins_dst)] group = group + DefineGroup('LVGL-port', src, depend = ['AIC_LVGL_METER_DEMO'], CPPPATH = CPPPATH, INSTALL = install) Return('group') -
增加入口函数,接入 UI 功能。
Luban-Lite SDK 中,已经融合了 LVGL-8.3.2,并与 AIC 芯片硬件接口、加速模块、触控等进行了对接,用户仅需接入 UI 部分的功能即可。
在 packages/artinchip/lvgl-ui/aic_ui.c 中,添加以下代码:void aic_ui_init() { #ifdef AIC_LVGL_BASE_DEMO #include "base_ui.h" base_ui_init(); #endif #ifdef AIC_LVGL_METER_DEMO #include "meter_ui.h" meter_ui_init(); #endif #ifdef AIC_LVGL_LAUNCHER_DEMO extern void launcher_ui_init(); launcher_ui_init(); #endif #ifdef AIC_LVGL_MUSIC_DEMO extern void lv_demo_music(void); lv_demo_music(); #endif #ifdef AIC_LVGL_TEST_DEMO test_thread(); test_ui_init(); #endif return; }注:Bringup 时不建议调整,使用运行默认程序即可。
-